christmas

Holiday Hosting 2017

Holiday Hosting 2017

With the holidays just around the corner now, there are parties that need a-hosting, and tables that need a-setting. I love to host gatherings with my friends, from simple cocktail parties to extravagant bashes, and of course, dinner parties with my closest friends are always a holiday favourite.

The Cocktail Party

When hosting a cocktail party, since the objective is to have your guests mixing and mingling, it’s easiest to simply set out your food and drinks buffet style. First, re-arrange your furniture to accommodate your guests and allow them the room to move easily throughout the room (setting a table against a large wall in the room, rather than the middle of the room, will allow for a better flow and access). Ensure that you have a pitcher or punch bowl of a non-alcoholic beverage available, and set out with some highball glasses, a bucket of ice, and some lemons and limes for garnishes. Set out wine glasses, as well as an uncorked bottle of red and white (don’t open too many right away, as your guests may bring you a bottle as well). Serve finger foods that are easy to eat and don’t require utensils, and be sure to provide lots of side dishes and napkins. Allow for some rest areas around the room that provide some seating and if possible, some tables for setting down a glass or a plate.

Setting The Table - BTSH Around The House Tip of the Week

Over the last few weeks, I have shown you how to create an advent calendar to count down the days until Christmas, how to dress up your home for the holidays, and the best gift ideas for the person who has everything. With the holidays just around the corner now there are parties that need a-hosting, and tables that need a-setting. I love to host gatherings with my friends, from simple cocktail parties to extravagant bashes, and of course, dinner parties with my closest friends are always a holiday favourite.

The Cocktail Party
When hosting a cocktail party, while you may not have place settings, you will certainly need to set out food and drinks buffet style. First, re-arrange your furniture to accommodate your guests and allow them to mingle. It’s best to set up a table for serving against a large wall in the room, instead of in the middle of the room. Set up a pitcher or punch bowl with a non-alcoholic beverage with some highball glasses, a bucket of ice, and some lemons and limes for garnishes. Set out wine glasses, as well as an uncorked bottle of red and white (don’t open too many bottles right away, as your guests may bring you a bottle as well, and it is best to offer to serve their wine first). Serve finger foods that are easy to eat and don’t require utensils, and be sure to provide lots of side dishes and napkins.

The Dinner Party
When hosting a dinner party, how you choose to dress up your table is up to you. Whether it be simple and elegant, or festive, or even themed, have fun with it. Be sure to set the table before your guests arrive. It will help to set the tone for the evening, and avoid the chaos of trying to get it done while entertaining your guests. Set out hand-written place cards for a personal touch, and that way you can choose the seat that you want that will allow you the most flexibility to balance serving with entertaining.

The Black Tie Themed Party
If you are hosting a formal, black tie style party, why not set your table in a black tie theme? Choose a black linen tablecloth, and crisp white linen napkins, with black and white dishware. Compliment with some shimmer, such as silver candlesticks, or a centerpiece of silver and gold ornaments. Add a splash of colour by using a single colour accent, such as red or purple, both hot colours this season.

The Festive Party
If you want to keep it festive, compliment your holiday decorations and set the table with the festive colours that you have chosen for your home. Create a feeling of warmth with candles, and bring out the holiday spirit with pinecone and holly accents.

If you’re attending a hosted party this season, avoid showing up empty handed. While most hosts will appreciate a contribution to the beverage bar, such as a bottle of wine or after dinner liqueur, feel free to bring something more personal instead, something that they can keep and enjoy after the party (see last week’s ATH for some great ideas).

Written by Shauna Lynn, Beyond The Stage Homes
www.beyondthestagehomes.com

Counting Down With a Hand-Crafted Advent Calendar - BTSH Around The House Tip of the Week

While I understand even as an adult that the holidays are all about family and friends, I can’t help but reminisce about one of my favourite parts of the holidays, which was the Advent Calendar countdown to Christmas. Let’s face it, who wouldn't enjoy counting down the days to Christmas with a piece of chocolate every day!

Well, given my love of crafts, and the environment, I thought it would be a great idea to help two of my favourite munchkins create their very own, reusable, advent calendar. My girlfriend’s kids have been a large part of my life, and I enjoy spending lots of time with them, so whenever we plan a sleepover, we also plan for a fun craft. This one was incredibly easy, and can be used for years to come. My only regret is that I didn’t make one for myself!

Tools You’ll Need:
Painting Canvas (minimum size 16” x 12”)
Christmas Fabric (optional)
Staple Gun (only necessary if using fabric)
Glue Gun—be sure that an adult does this part
25 Small bead containers or small boxes
25 Foil Squares—cut into squares approximately 2”x2”(necessary only if containers don’t have lids)
25 Candies/Chocolates—be sure they fit into whatever containers you have chosen
Scissors
Construction Paper
Scotch Tape
Permanent Marker
Christmas craft accessories—eg: scrap-booking decals, garland, beads, confetti, etc

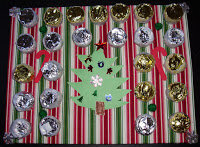
Cut the fabric to approximately 1” larger than the canvas on all sides. Stretch over the canvas, and use the staple gun to tack to the back of the canvas. If you don’t want to use fabric, set out some paints for the kids to decorate the canvas with. Then let the kids use the accessories to decorate however they see fit! I found it best to have them lay everything out on the canvas how they wanted it, and I simply went over it all with the glue gun when they were done. This allows them to make any changes they want to along the way.

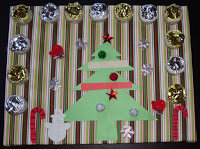
For the containers, I had found these plastic bead containers at the dollar store, but they didn’t come with lids. So, we went to the bulk food store to find the candies, and while I was there I picked up some pre-cut 4”x4” foils in silver and gold (sometimes they will have other colours available as well). I then cut these into quarters, had the kids write the numbers 1-25 on them with a permanent marker, and we attached them over our containers by simply wrapping the edges in clear scotch tape (after putting the candy/chocolate inside of course). Each day in December, they simply poke through the foil to get their treat. I also cut strips of festive coloured construction paper 4” x 1/2”, and these were placed inside the containers to wrap around the inside edge to keep from being able to peak at the treats. Wondering why the one on the left has fewer containers? She didn’t want to take away from the decorations, so she put 2 treats in each container, and marked each with 2 days. The best part is that these can be used each year simply by replacing the treats, and the foil. It doesn’t get much simpler!

Written by Shauna Lynn, Beyond The Stage Homes
www.beyondthestagehomes.com