around the house

Inexpensive Kitchen Updates that Sell

Inexpensive Kitchen Updates that Sell

1. Light Fixtures

Review all of the lighting in your kitchen and identify when it was last updated? This includes your eating area, above your island (if applicable), and above the sink. As a general rule, if the light fixtures have not been installed within the past 10 years, they will likely need to be replaced. If the light fixtures are the original ones that the builder installed, they should likely be replaced.

Here is what not to do:

The Dos and Don'ts of Hiring a Designer

The Dos and Don'ts of Hiring a Designer

DO

Provide information regarding your style

  • This may be magazine photos, Pinterest pins, or physical samples – you don’t even have to know what you like about something, but the more information that you can provide to your designer, the better

Provide Samples

  • If you have already selected any renovation materials, be sure to have samples of those items available for your designer

Provide Creative Autonomy

  • This is something that many homeowners struggle with – remember that you hired your designer for their expert, professional opinion, and there may be times where you will need to trust them to take you outside of your comfort zone.

  • Our goal is to integrate your style with our expertise to create a design plan that you will love for years to come. The more autonomy that we have, the easier it is to create this, but we want to ensure that we do so with your trust and understanding – if at any time you do not feel that you are being heard, or are not comfortable with a decision that has been made, be sure to address it as soon as possible to avoid any issues or unnecessary costs.

  • It’s all in our head - we understand that you may not always be able to see what we see! Sometimes, you may simply need to take a leap of faith and trust, but if this is something that you are not capable of, ask, and we will do our best to provide a visual representation of our vision.

Kitchen Tips - BTSH Around The House Tip - September 2010

From storage, to cleaning, to keeping food fresh, here are some tips that I have tried and tested, and am now ready to share with you.

Cleaning Odors from Your Cutting Board (and hands)
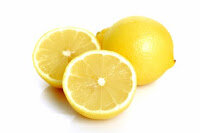
Fresh lemon, nothing works better! Cut a slice of lemon, and rub on your cutting board after using your board for strong odour foods such as garlic or onions.


Coffee Ice Cubes
Do you enjoy iced coffee drinks? Take unused coffee and pour into an ice cube tray and freeze to use as ice cubes in your drinks. Also great for black coffee drinkers that want to cool down their coffee quickly without watering it down.


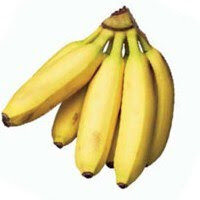
What To Do With Bad Bananas
When you notice your bananas starting to turn brown, the best thing to do is throw them into the freezer while you decide what you would like to do with them. I enjoy smoothies and shakes all year round, so I’ll use the frozen bananas in these. If you peel and slice before freezing they’re even easier to use, but it’s not necessary. Another great use is banana bread. Most banana bread recipes suggest using over-rip bananas, and they’re easier to use once they’ve been frozen and thawed as no mashing is required. You can also use the banana peels in your garden. Bury in the dirt near your tomato plants or roses to add potassium to the soil.

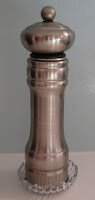
How to Control Pepper Grinds
This tip actually came from my mother. She found a small, round glass dish, actually meant as a candle holder, and she placed this under her pepper mill. This is great for keeping pepper grinds from getting on your counter and table.

How to Clean Your Microwave—Naturally
Cut a lemon in half and place skins down in a bowl. Cover half the lemon with water, and place in the microwave. Microwave on high for about 5 minutes. After the microwave is done, leave the bowl with the lemon in there for another 5 minutes. Remove the bowl and wipe the microwave clean.

Keeping Onions Fresh
Once again, Mom to the rescue. She found me a great onion keeper, though unfortunately I’m not sure where she got it. I found a similar one online, and discovered that they also sell these keepers for tomatoes, and peppers. The keeper has a slightly raised, grooved bottom that keeps the onion fresher longer, while keeping the odour out of my fridge.

Written by Shauna Lynn, Beyond The Stage Homes
www.beyondthestagehomes.com

Controlling Pests - ATH Tip from BTSH

Warm weather and humidity can bring many unexpected guests. No, I’m not talking about family and friends “popping in” this summer, I’m talking about the unwelcome little critters that can be found in and around your home. Here are some natural methods for ridding your home of these pests:

Fruit Flies
I have heard a lot of remedies for getting rid of fruit flies, but the one that I find works best is the “trap”. Place a piece of fruit in a jar (something sweet like strawberries or peaches I find works best). Pour vinegar in the bottom of the jar, about 1/2 cm. Place the lid on the jar, and poke holes in the lid. The fruit flies will be attracted to the fruit, and get trapped in the jar, then drown in the vinegar.

Ants
If you have found the ants entry point to your home, the best solution is to patch the hole, but if it’s not that simple, then sprinkle coffee grinds or mint leaves around it to deter future entry. Sprinkle chilli powder or cinnamon in their path. Make a natural repellent of citrus peelings and water in a blender and pour it over the anthill. To create a bait, mix Borax with confections’ sugar.

Spiders
Only cool around Halloween, and then it’s only the fake ones that I like!

First off, keep all other bugs out of your home in order to prevent spiders from setting up shop. Spiders eat other bugs, so if they don’t have an easy meal to catch, they’ll look elsewhere. Of course, if you have a real bug problem, leave spiders as the last pest to rid your home of, as they’ll help you get rid of the others!

I like to vacuum any nests that I find, but you can use a broom as well if your vacuum doesn’t have an attachment that will reach. Essential oils are great to killing spiders. To keep spiders from returning, mix soap, water, and citrus oil and spray areas that spiders like to hang out.

Prevent Return Visits!
In order to prevent the return of these pests, be sure to keep your home clean!
- Wipe counters and tables with a mix of vinegar and water
- Be sure that all holes are patched and vents are screened
- Don’t let food sit out
- Be sure your garbage has a tight fitting lid, and empty regularly.
- Don’t leave dirty dishes in the sink
- Don’t allow water to sit out for a long time

Written by Shauna Lynn, Beyond The Stage Homes
www.beyondthestagehomes.com

Starting Plants from Seeds - BTSH Around The House Tip of the Week

A few weeks ago I talked about getting your yard ready for spring. While it is a great time to rake, clean up the debris of winter, and cultivate soil for our gardens, it may not be wise to put out new plants just yet. There is still some risk of frost, therefore it is best to wait for a couple of weeks. You can however get a head start by planting your seeds indoors, and allowing them to grow for a couple of weeks indoors before transplanting.

Tools You’ll Need
Seeds of your choice
Peat Moss Pots
Sharpie
Plant Marker Posts
Large Container for Pots—I used an aluminum roasting pan
Small Watering Can
Soil
Plant Food (optional)

Getting Started
All plants will have somewhat varying instructions for planting. These should be printed on the back of the packages of seeds. Be sure to read through these carefully before you begin. This year I chose to plant beans, peas, carrots, cucumbers, and rosemary. I noted when reading through that peas are actually safe to plant directly outdoors, prior to last frost. All others were planted in pots according to their directions.

Next, decide how many pots of each seed you wish to do. Using your sharpie, label the peat moss pot to easily identify the plants later.

Fill your peat moss pots with soil. Plant seeds according to the package directions. Top with soil as needed. Place pots in the container you’ve chosen (as I mentioned, I simply picked up an aluminum roasting pan and arranged my pots in there). Lightly water the seeds, and place indoors in the sunniest location.

Caring for Your Seeds
Water your seeds daily. After a few days, the seeds will start to germinate. Once you start to see some signs of plant-life, you can use some plant food if you like. Allow a couple of weeks for the plants to grow to a reasonable size before moving outdoors, ensuring that the chances of frost are minimal. The beauty of the peat moss pots is that these can be planted directly into the soil, no transferring required. Plant according to directions on the seed packages again, careful to lay out the plants based on available sunlight and their needs. For plants that grow into the ground, such as carrots, poke a few holes in the bottom of the pot to allow it to break through easily. Continue to water regularly. By summer, you’ll have a thriving, healthy garden!

Written by Shauna Lynn, Beyond The Stage Homes
www.beyondthestagehomes.com

How To Make a Simple Spring Door Hanger - BTSH Around The House Tip of the Week

I often see some fun door hangers for spring, but always find that they’re just not quite the right size, or colour. This year, getting inspiration from my budding tulips and daffodils, I decided to try my hand at making my own. This was a lot of fun to make, incredibly inexpensive, and really quite easy. This is a project that could even be done with older kids (age 8 and up).


Tools You’ll Need
This is really up to you, depending on how you would like to decorate your wreathe, but I have listed what I used (all of which were simply purchased at the dollar store), and you can feel free to modify to your style:

Kraft Wire String
Ribbon (2 different complimentary colours)
Artificial flowers
Craft Butterfly
Glue Gun

Making The Wreath
Now that you’ve selected your tools, start by making the wreath. To do this, I first made a circle to the size I wanted out of the kraft wire. Then I looped it again to double it, and then I wrapped the wire around the length of the circle, to give it stability. Then, I detached my flowers from their “stems”. The pink flowers were actually a part of a wreath already, but cut them off at their ends still. Next, I attached two of the larger flowers to what would become my outer two edges of the wreath. To attach, simply wrap a piece of kraft wire around the stem, and around the wire wreath (see picture at right). Next, wrap the whole wreath in one of the ribbons that you’ve chosen. I chose the green lace, and decided it would make the most sense to do this before attaching the remaining flowers. Use the glue gun to secure the lace to the wreath in it’s last loop around. Wrapping the lace in this way provided the wreath with even more stability, and gave it a great background colour to work with. Continue to attach flowers and/or butterflies or other accessories with kraft wire around the wreath until it is as full as you desire.

The Finishing Touches
As a final touch, I loosely wrapped the sheer pink ribbon around the entire wreath, careful not to fully cover any of the flowers. I used the same lace to tie a loop at the top for hanging. This is now proudly displayed on my front door to welcome guests!

Written by Shauna Lynn, Beyond The Stage Homes
www.beyondthestagehomes.com