paint

10 Low Budget Home Staging Hacks to Use in Everyday Life

10 Low Budget Home Staging Hacks to Use in Everyday Life

Our home staging clients often tell us how much they wish that they had brought us in sooner, before they decided to sell the house, so that they could have enjoyed some of the changes that we made! They especially love seeing some of our home staging tricks and hacks first hand, so we’ve decided to share some of our favourites with you! You can put these low-cost ideas to use in your home, regardless of whether or not you are selling.

1. Use baskets to hide cables

It’s not a fancy trick, but it can be incredibly effective. Hide routers, cables, and other messes using baskets. NOTE: some items (such as routers) need room to vent, so be sure to account for and allow for this.

Consider adding a shelf under your desk to get the cords and cables off of the floor.

10 Things Your Home Stager Did NOT Learn From HGTV

We get it, you've watched all of the home renovation and home sale shows, read all of the online articles and tips regarding setting up your home to sell, and you have checked off everything on every home selling checklist you could find, so why would you need to hire a Professional Home Stager? We often hear homeowners say, “I don’t need a stager, I watch HGTV all the time, and I know that I need to remove the clutter and the personal items.”

These reality shows have really put the home staging industry in the spotlight over the last few years, and have helped homeowners to better understand the importance of preparing their home prior to listing it for sale. But, while these shows provide the basics of what this preparation involves, they don’t provide the full picture of what it really takes to properly style and STAGE your home in order to evoke the emotional connection that your prospective buyers are looking for.


Your home is one of a kind, and it should be treated as such! You want to stand out from the competition, so why would you use the same checklists as everyone else? Would you clean your own teeth, or would you choose to hire a trained professional to do this for you? Your home deserves the right attention with specific recommendations, geared towards your home, from an expert that specializes in doing just that, in order to highlight your home’s greatest features. So what are these articles and lists NOT telling you? As a Home Stager, these are just a few of the things that we have learned, through our professional training and many years of experience

      1.      Where to place YOUR furniture so that the room remains open and inviting, while maintaining function and flow

This does not mean simply moving all of your furniture to the edges of the room. This means understanding proper traffic flow, as well as the latest furniture styling trends. We will evaluate what should stay, what should be removed, and where to properly position your furniture to optimize flow, eliminate awkward spaces, and highlight the best features of the room.

      2.      Shelf Styling

By far one of the trickiest decorating techniques to master, this is the art of filling the shelves to catch your eye, without diverting your attention from the room. This means selecting the right size and style of pieces to compliment the space and the shelving unit, and understanding the balance between too little and too much.


      3.     Paint Colour selection

Just because a colour is popular or trendy, does not mean that it’s the best one to use for your home. Colours are selected based on lighting, home style, and the colour of the finishes of the home. Sure, we have our favourites, but each colour is selected to best suit the home.

      4.     What local trades will provide you with the best services, at the best value prices

We have spent a great amount of our time forging valued relationships with highly skilled trades to ensure that you receive quality work, every time. We only work with professionals, and often these professionals will provide special discounts to our clients.

      5.     Where to shop for the final touches and accessories that your home needs

We spend more time than anyone shopping for home décor items and finding the best deals, and we can provide you with some direction on this to help you to avoid driving all around town looking for the perfect piece. Of course, you would save even more time if you hired us to provide you with the accessories and accent pieces that your home needs.

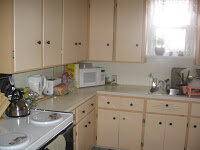
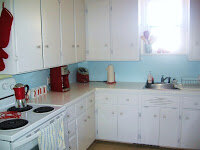
      6.     Which updates/upgrades will most benefit YOUR house in YOUR market, neighbourhood, and price range

We not only evaluate what upgrades and repairs would add to the value of your home, but we look at what will help to increase it’s overall sell-ability – upgrades are not worth much if they’re not the right ones to entice your specific buyers. We consulted on a home once that spent a great deal of money replacing their kitchen, but for their target market, their funds would have been better spent doing other repairs to the home and minor updates to the kitchen.

      7.     How to make a bed

Forget what your mother taught you – making your bed before work, and styling your bed to sell your home are completely different! I can’t tell you how often we see this common mistake in listing photos.


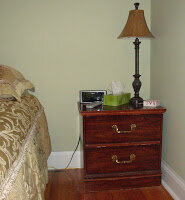
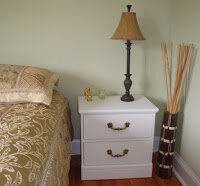
      8.     How to utilize a piece of furniture for an alternate purpose

This does not mean putting an end table in an office and calling it a desk. It’s about thinking outside of the box when it comes to finding the right piece, often within your home already, to fulfill a purpose for a room and help to clearly define the space.

      9.     How to enhance your curb appeal

Yes, cut the grass, trim the trees, and mulch the gardens, we know that you have that covered. But there’s likely more that you should be doing. If your buyers are not engaged with the home before they get to the front door, you could potentially lose out on that sale. We are property stylists, and we want to be sure to create an inviting space, inside and out.

      10.    How to maintain function and daily life, while living in a staged home
  
      We understand that it’s not easy to maintain a show-ready home, but we have seen it all and are prepared to provide you with easily implementable solutions to help you to get through the day-to-day. Of course the best part is, in a professionally staged home, you won’t have to maintain it for long before it’s SOLD!

The checklists and tips you find online are a great step towards preparing your home, but a Professional Home Stager can provide you with the specific recommendations that will help you to bring in the buyers and sell your home.

Contact Beyond The Stage Homes today to find out how to get your property sold!

Phone: +1 (226) 240-0766
Email: info@btshomes.com
www.beyondthestagehomes.com 

The GREEN Movement - BTSH Around The House Tip of the Week

Choosing paint that’s right for you, and for the environment

2009 Colour Trends

If there is one colour we simply can’t get enough of in 2009, it’s gotta be GREEN!! That’s right, not just an eco-friendly idea, but top paint companies like ICI Dulux, and Benjamin Moore, agree that green is the new beige. Green is a very serene and calming colour, and reminds us of natural elements and what our environment has to offer us.

One thing I cannot stress enough in decorating is that neutral does not have to mean builders beige. I am often caught reciting this to my clients. Don’t get me wrong, there are some wonderful neutrals in the taupe/beige family, but neutral does not have mean dull, lack-lustre, and boring. Feel free to add a touch of colour to your neutral.

In Home Staging especially, you will hear various ideas about the best way to show your home in order to maximize your profits. Decluttering and depersonalising are two that are undoubtedly and consistently true in every home. Depersonalising refers to taking down the family photos and knick-knack souvenirs from family vacations in an effort to allow potential buyers to envision themselves in your home. You’re essentially selling a product. Often this also can mean covering up the brightly painted walls as well. While you may want to live in a rainbow of colours, as I mentioned you are selling a product, and therefore it’s often a good idea to tone down the colours in your home to something more neutral. That being said, it’s unlikely that potential buyers will want to live in builder’s beige. Feel free to explore colours outside the beige family, provided it is a nice soft hue, such as a lemon yellow, or a light olive green.


What makes a paint an environmentally friendly “green” paint?


Paint has been given a bad rap for years, due to the fumes and chemicals that are put into the air from it, otherwise referred to as VOCs (Volatile Organic Chemicals). So how do you know if you’re choosing a green product? While many paint manufacturers claim to be green, very few actually are. Part of the inaccuracy of their claims stems from the vast number of certification organizations with a variety of standards. According to TerraChoice, an environmental marketing company that manages the EcoLogo program, organizations that can be trusted include EcoLogo, the Forest Stewardship Council (FSC), Green-e and Greenguard. If you’re unsure about a paint, look for the certification from one of these companies. Look for natural paints, or at the very least, zero to low VOC paints. The standards are continually evolving, and new methods are continually introduced for creating an environmentally friendly paint that will adhere easily, and is durable enough to stand the test of time. If you’re still unsure, ask your local paint professionals.

Written by Shauna Lynn, Beyond The Stage Homes
www.beyondthestagehomes.com

The Wonders of Paint - BTSH Around The House Tip of the Week


It’s easy to freshen up the look of any room with fresh paint, but why limit yourself to the walls?


EXTREME KITCHEN MAKEOVER ON A BUDGET

It’s hard to believe that this is the same kitchen in both pictures. It’s amazing to see how a little paint helped to freshen up the look of this dated kitchen. If you’re planning to paint your kitchen cabinets, be sure to choose a primer and paint that are suited for the surface you’re painting. If you’re unsure, ask at your local paint store. No matter what the surface, remove all doors and sand before painting. Because these cupboards had been painted previously, they were completely stripped down (turned out there were a couple more layers of paint under that peach colour)! Update the hardware as well, including the hinges. You’ll also note that the backsplash in this kitchen was painted. Both the backsplash and counter were an old arborite laminate, and unfortunately it wasn’t in the budget to replace these. Instead they were sanded, painted with a melamine paint, and sealed with a lacquer.

WHAT WAS OLD IS NEW AGAIN


This bedside table was showing it’s age, but it still had good bones. It was about 30 years old, solid wood, and the perfect size for this space. So, it was sanded down, primed, and painted white. Because of the thick varnish on the wood, I used a bonding primer. It bonds to any surface, and allows the paint to bond to it easily as well. While I would normally suggest updating the hardware, in this case, the brass drawer handles went great with the gold in the bedspread, and so they were simply polished and re-attached.

SPRUCE IT UP WITH FUN STENCILS

Stencilling is an age old technique, and is a great way to add a personal touch, or simply add a touch of colour to any wall or furniture piece. Stencils can be found at any craft store, or online. Want to spice it up with multiple colours? If using a single template, simply tape over the areas that you want to paint a different colour. Multilayer stencils with overlays make multi-colour stencilling a lot easier. Simply tape the base stencil to the surface, paint the first colour and remove, then place the overlay according to the registration marks on top of the base, and paint with the next colour.


*All stencil images found at stencilease.com

Written by Shauna Lynn, Beyond the Stage Homes
www.beyondthestagehomes.com